Getting Your Books In Barnes & Noble
- Stacy J
- Aug 11, 2022
- 7 min read
I have had many people ask me how do I get my book in Barnes & Noble. Before I tell you how, let me tell you why you should have your books on the Barnes & Noble platform. They are the biggest bookstore right now. Even if you don't physically have your book in their store, having it on their online presence is a status change for you as an author. You are able to work with them on book signings and advertisement. Barnes & Noble is a great place to put your book because you don't have to pay anything. It use to be you had to pay thousands of dollars to get your book published and out to online bookstores, in physical bookstores, etc. Now, you can upload your manuscript and have a certified published book out there.

Now let me tell you how to get your book on Barnes & Noble. First you have to create an account under Barnes & Noble Press. Once you have done that you will be asked for your EIN #. If you don't have an EIN # please check your state tax website to get one. Once you complete your profile you will be able to post and create books on their site.
After your profile is active, you can log in to your Barnes & Noble Press account and select CREATE A BOOK. You will then be asked if you would like it print or an ebook. Choose which one you would like. If you would like both you will have to go through the process twice to create both.


We are going to go through the print book option. Then you will be asked for the BOOK TITLE.

Once you put in your title you will be asked if you want to sell your book or keep it personal. Choose which option you want, but we are going to select sell my book. (If you don't choose sell my book people will not be able to see it on the Barnes & Noble website).

They will then ask do you want this book set up on preorder. If you choose pre-order that means people will be able to purchase your book before it is actually released and once it is released their book will be shipped out. If you select, No, its not, then people will have to wait until your book is actually on sale (the date you will choose later) to order the book.

Now, you will be asked to choose your book size and type. Here is where you will put what size book you have. You can choose any size, you should already have your book formatted to the size you want at this point. Once you choose the estimated page count and page size then you will choose what interior print color you would like. For novels its typically black and white. If you have pictures you may want to choose standard color, if you are doing a book with a lot of photos, such as a cookbook, you will want to choose full premium color. Then you will choose what type of cover you want. many books are paperback, that is the cheapest route, but if you want a hardcover book you can have that with or without a dust jacket. A dust jacket is the paper with your cover on it that goes over the book instead of directly on the book. The cover finish can be matte or gloss. if you choose matte you will not have a shiny book. Gloss is the most common. For the paper color, you are choosing the thickness as well as the color. Cream 50lb and White 50lb are standard. If you choose white 70lb the pages will be thicker. This may cause your book to be a bit heavier.

Once you have chosen your book details you will see a printing cost per book at the bottom. This will tell you how much it will cost to print your book. See below.

For the options I choose this book with cost $3.60 to print. If you look at the options I put in this book doesn't have a lot of pages and the size is average. You will also notice your book title at the top of the page. I put in Testing because this is for informational purposes only. You can always change anything you have selected until you put the book on sale. If you want to play with the options do that. Sometime making your book larger with less pages can be more affordable.
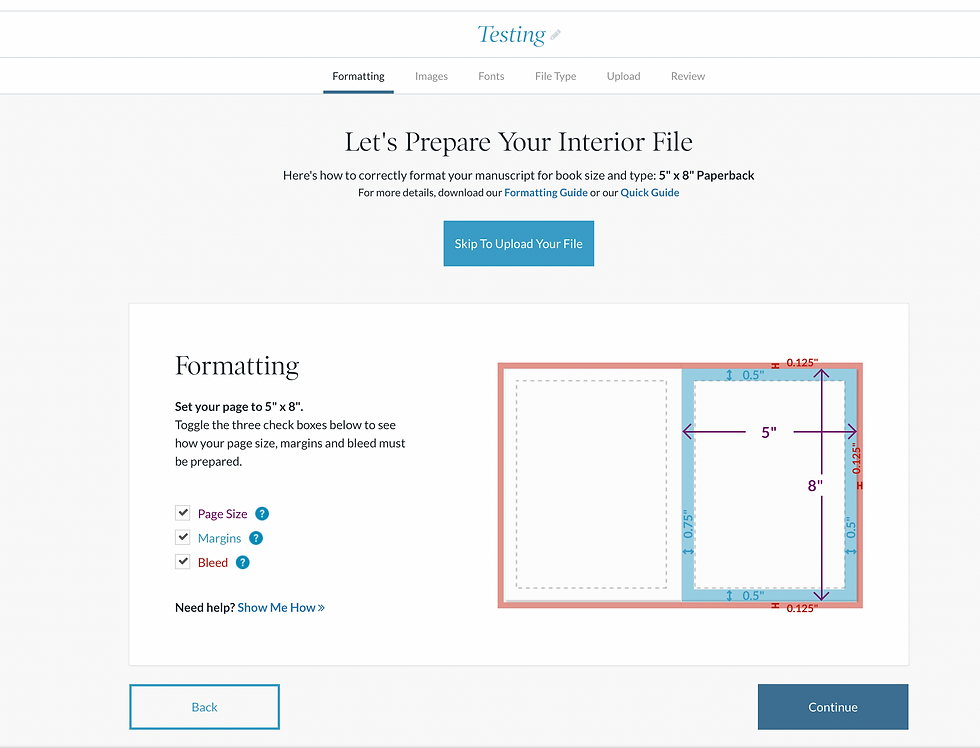
Now you are ready to upload your book. In order to upload your book you will need to make sure it is formatted in the size you have selected. You will have an error if you are trying to upload a 6x10 book under then 5x8 format. You will also have to make sure your margins are set properly so that words are not being cut off or at the edge of the page. You can skip this step if you need to edit your interior file (which is your book entirely without the cover and back cover). Just click the skip to upload your file, then skip this step. They will give you a date your file must be uploaded to go on sale. Once you upload your interior page you will then be directed to upload your cover pages.
Now you will select if you want to upload a singe photo for the front and a single photo for the back or if you want to upload the entire cover front and back together. It may be easier the first time to upload the singe photo for front and back. If you know how to create one long front and back cover you can do that as well. I have done it both ways. It takes more time and work to create the full one sheet cover, but it makes the upload easier and you don't have to create the side edge (which we will get to shortly). Select your option and it will take you to the upload page. We are going to select upload front & back cover file for this example.

Here you will see all the setting for your book based on what you put in. In this example it is for a 5x8 book. You have to make sure the book cover is clear, the correct size and nothing will be cut off. They will tell you exactly the size your cover has to be. Below you see it says 5.125x8.25. That is because the cover of the book is going to be a bit bigger than the interior. The cover is also based on the thickness of the book. You will see below all the measurements that automatically come together based off what you enter. You will select the skip to upload your files button at the top.

Once you review this page and skip to upload your files you will be taken to the page to upload your preorder cover IF you selected the book is available for preorder. If you didn't it will take you directly to upload your book cover.

If you are allowing your book to be preordered you can select the same cover photo or a generic one. You can use a JPEG or PNG. You will see the system working while it is uploading and formatting your photo.

I just used a generic photo for the preorder cover, but as you can see once it is cleared it will show in the box on your screen.

Once you have uploaded your interior, book cover and preorder cover you will be directed to give information about your book that people will see. (See below)

You will have to go through and select detailed information about your book. The publishers name, the date you want it published and as you can see the green Botton next to the publication date means it can go on preorder and people will see the preorder photo until the book is actually published. You will give a preview on the book. You will go through each of the tabs at the top: about, author, categories, pricing, rights & other information, editorial review and ISBN.
When selecting your category Barnes & Noble has it setup to how they categorize things so make sure you select which best fits your book.
Pick the price you want for your book and it will show you what you will get when someone buys your book after printing, shipping and handling. I am not going to go through each section for times sake. However, if. you have questions there is a customer service email that can help you.
You do not have to put editorial reviews unless you want to.
When you get to the ISBN this is where you assign your book and ISBN for FREE.

Once you get an ISBN # you will not be able to change it so make sure if you don't have one you select NO. Barnes & Noble will provide you with one and it will be associated with your book forever. This is how they will determine sales, and other bookstores will be able to identify your book. Once you hit submit it will take you to review all your information. You will see everything you put in on this page. If any changes need to be made you will make them here.


I didn't put in a lot of the information because I don't actually have a book to upload but you will see all your information here. You will also see your Barnes & Noble URL for your book that you can share with social media and/or friends. Which is a great way to promote your book. Below you will see that your account and registration with Barnes & Noble is active. If your account is not active you will not be able to publish a book until it is.

Once you have completed all your tasks your book will be published and it will look like this. (See below)

If you have a print and ebook it will look like this (see below). When you see the green check mark at the end of the four boxes by your book that means your book is on sale.

There may be some issues you encounter when uploading your book interior and cover, but they are typically size errors. To get past that make sure you're uploading the correct sizes. I hope this helps all those writers out there who have been trying to figure out a way to get their book published for FREE and get noticed through Barnes & Noble. Helpful tips, tricks and ideas to help you write your story- Happy Writing!

Follow us on
Instagram @ajournalisticviewmagazine
Twitter @ajournalistic
Facebook @ajournalisticviewmagazine
Reporter for this article is Stacy Ayiers-Latimore. Reach the reporter of this article
Follow Stacy on Instagram @StacyJAyiers Facebook@ StacyJewel
Subscribe today to receive blog notifications on travel, food, personal growth, love & relationships!
#stacyayiers #ajournalisticview #SJMedia #writingtip #writing #writeabook #learntowriteablog #write #barnesandnoble
Comentarios